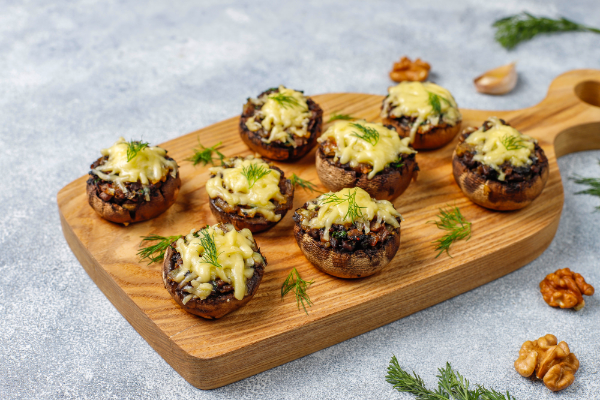
Stuffed mushrooms
Picture this: the warm glow of holiday lights, laughter echoing through your kitchen, and a plate of golden-brown appetizers disappearing faster than you can refill it. That’s the magic of mastering this crowd-pleasing dish. Whether you’re hosting Thanksgiving or a casual dinner party, these bite-sized treasures turn ordinary moments into memories.
You’re about to learn why this restaurant-quality appetizer has become a secret weapon for home cooks. Cream cheese creates a velvety base that melds with garlic, herbs, and breadcrumbs – transforming simple ingredients into something extraordinary. The best part? You’ll achieve crispy perfection in under 45 minutes.
We’ll guide you through selecting the right mushroom caps (baby bellas work beautifully) and share pro tips to avoid soggy results. Discover how to balance flavors so every bite delivers savoury richness without overwhelming delicate palates. Plus, you’ll love the make-ahead flexibility – perfect for stress-free entertaining.
By following this recipe, you’ll create appetizers that look gourmet but feel approachable. Imagine serving golden-brown caps with that irresistible crunch on top and melt-in-your-mouth filling beneath. Your guests will never guess how effortless it was to prepare.
Table of Contents
How to make stuffed mushrooms using cream cheese step-by-step
Course: AppetizersCuisine: AmericanDifficulty: Easy4
servings20
minutes25
minutes60
kcalIngredients
🍄 Baby Bella Mushrooms – 1.5 lbs
🧄 Fresh Garlic – 2 cloves, minced
🧀 Cream Cheese – 4 oz, softened
🍞 Plain Breadcrumbs – ¼ cup
🧂 Grated Parmesan – ¼ cup + extra for topping
🌿 Fresh Parsley & Thyme – 2 tbsp each
🧈 Unsalted Butter – 2 tbsp
- Optional Add-ins:
🌞 Sun-dried tomatoes (chopped)
🌰 Toasted pine nuts
🍖 Cooked sausage crumbles
🧀 Feta or fontina cheese
🌶️ Smoked paprika (for dusting)
Introduction: A Delicious Appetizer
Ever wonder what makes an appetizer both elegant and effortless? These bite-sized wonders deliver restaurant-quality appeal with home-cooked simplicity. Their secret lies in a creamy filling that transforms basic ingredients into something extraordinary.
Discover the charm of crowd-pleasing bites
One nibble reveals why these caps become the star of any spread. The garlicky, cheesy flavor bursts through each tender bite, while golden breadcrumbs add satisfying crunch. They’re ideal for last-minute hosts, prep takes minutes, and leftovers? Don’t count on it.
Why cream cheese rules the filling
Forget dry or crumbly textures. Cream cheese melts into a silky texture, blending herbs and spices into a rich, cohesive mix. Unlike shredded varieties, it won’t separate when baked. This creates that “wow” factor guests adore creamy centres beneath crispy tops.
Perfect for holiday parties or game nights, this recipe adapts to any occasion. Double the batch for large gatherings, or freeze extras for impromptu cravings. Either way, you’ll master the art of effortless entertaining.
Gathering Ingredients & Essential Tools
Ready to transform basic components into culinary magic? Your success starts with quality items that create harmony between creamy richness and satisfying crunch. Let’s break down what you’ll need and how substitutions can spark creativity.

Must-Have Ingredients for Flavor and Texture
Baby bella caps (1.5 lbs) form your edible cups; their earthy depth outperforms white button varieties. Fresh garlic (2 cloves) minced finely becomes your aromatic backbone, while softened cream cheese (4 oz) ensures lump-free blending. Plain breadcrumbs (¼ cup) offer golden crispness, though panko adds extra crunch if you prefer texture contrast.
Finely grated Parmesan (¼ cup + topping) delivers nutty sharpness, but Gruyère works for bolder palates. Fresh parsley and thyme (2 tbsp each) brighten the richness – dried herbs work at half quantities. Unsalted butter (2 tbsp) ties everything together with its velvety finish.
- 🍄 Baby Bella Mushrooms – 1.5 lbs.
- 🧄 Fresh Garlic – 2 cloves, minced
- 🧀 Cream Cheese – 4 oz, softened
- 🍞 Plain Breadcrumbs – ¼ cup
- 🧂 Grated Parmesan – ¼ cup + extra for topping
- 🌿 Fresh Parsley & Thyme – 2 tbsp each
- 🧈 Unsalted Butter – 2 tbsp
Optional Extras to Elevate Your Recipe
Sun-dried tomatoes bring tangy sweetness that cuts through creaminess. Toasted pine nuts add Mediterranean flair with their buttery crunch. For meat lovers, cooked sausage crumbles add savory depth while letting the dish’s delicate flavors shine.
Experiment with cheeses like feta for saltiness or fontina for meltability. A sprinkle of smoked paprika before baking adds subtle heat and visual appeal. These tweaks let you customize bites for different tastes while keeping prep straightforward.
Preparing and Cleaning Your Mushrooms
Ever noticed how restaurant-quality appetizers maintain their perfect texture? It all starts with proper prep work. Treating your ingredients right ensures crispy results that hold their shape – no sad, waterlogged bites here.

Read also: The Ultimate Seafood Casserole Recipe: Creamy, Cheesy & Irresistible!
Proper Cleaning Techniques to Avoid Sogginess
Grab a colander and work fast. Rinse caps under cold water for 3 seconds max – any longer and they’ll soak up moisture like kitchen sponges. Pat dry immediately with a damp paper towel, paying attention to crevices near stem bases.
Why the rush? Excess water steams out during baking, creating soggy bottoms. Properly dried caps stay firm while roasting, giving your filling a stable foundation.
| Step | Right Way | Wrong Way |
|---|---|---|
| Rinsing | 3-second cold water splash | Soaking in bowls |
| Drying | Paper towel pat-down | Air-drying on racks |
| Stem Removal | Twist-and-pull technique | Cutting with knives |
Removing and Chopping the Stems for the Filling
Pop stems out gently using your thumbs. This creates neat cavities without tearing delicate caps. Those stems aren’t trash – they’re flavor goldmines!
Chop stems finely to blend seamlessly into your cream cheese mixture. Sauté them briefly with garlic for deeper flavor before mixing. You’ll add earthy depth while reducing filling moisture.
Creating the Cream Cheese Filling
The heart of these irresistible bites lies in their creamy center. Let’s build a flavor-packed mixture that balances richness with texture – your secret weapon for memorable appetizers.

Combining Cheeses with Bread Crumbs
Begin with room-temperature cream cheese in a large bowl to guarantee a smooth, lump-free blend. Gently fold in freshly grated Parmesan its sharp bite balances the rich creaminess perfectly.
Cook chopped stems in butter until golden. This step intensifies their earthy flavor while removing excess moisture. Sauté minced garlic until it’s fragrant and golden, then combine it with toasted breadcrumbs for a flavorful crunch
Seasoning with Garlic, Herbs, and Spices
Fresh parsley and thyme brighten the mixture. Chop them finely for even distribution – you’ll see vibrant green specks in every bite. A pinch of salt enhances all flavors, while black pepper adds subtle heat.
Always taste before filling your caps. Adjust seasonings until the mixture makes your taste buds sing. This attention to detail separates good appetizers from “can I get the recipe?” masterpieces.
Stuffed Mushrooms: Expert Techniques and Tips
Mastering the art of appetizer perfection requires precision in both preparation and execution. Let’s explore professional methods that ensure every bite delivers consistent flavor and structure.
Filling Techniques for Even Distribution
Choose large cremini varieties – their broad caps act as sturdy vessels for generous portions. A chilled filling holds its shape better than room-temperature mixtures. Use a teaspoon or mini scoop to portion filling neatly, pressing gently to create adhesion without crushing delicate caps.
- Chop add-ins like sun-dried tomatoes to match pine nut size for balanced bites
- Pre-cool mixtures for 15 minutes to prevent spreading during assembly
- Overfill caps by 10% to account for settling during baking
Maintaining the Perfect Texture
The ideal consistency resembles thick frosting – spreadable but not runny. If your mixture feels too wet, add breadcrumbs one teaspoon at a time. For extra crunch, sprinkle reserved Parmesan on top before baking.
Test your filling’s readiness with this trick: Scoop a spoonful onto a plate. If it holds its shape for 30 seconds without slumping, you’re golden. This ensures your creations stay intact from oven to serving tray.
Step-by-Step Assembly Instructions
Transform your kitchen into a gourmet prep station with these foolproof assembly techniques. Perfect placement and strategic seasoning turn simple ingredients into showstoppers that bake evenly every time.
Prepping Your Workspace
Fire up your oven to 400°F while lining a baking sheet with parchment. This temperature creates the ideal balance – crispy tops without burning delicate fillings. Lightly grease the surface to prevent sticking during the crucial golden-brown phase.
Artful Arrangement & Seasoning
Place cleaned caps cavity-side up like little edible bowls. A quick olive oil drizzle and salt sprinkle work magic – they enhance natural flavors while helping surfaces caramelize beautifully. Space them ½ inch apart for optimal air circulation.
- Use a small scoop for uniform filling portions
- Press mixture gently to create adhesion
- Top with extra Parmesan for crust formation
Baking Science Made Simple
18-22 minutes transform raw ingredients into perfection. Watch for two visual cues: tender caps that yield slightly when pressed and filling that turns golden. Let rest 3 to 5 minutes, this settling time improves texture and prevents mouth burns.
| Stage | Ideal Time | Visual Cue |
|---|---|---|
| Preheating | 10 minutes | Oven light turns off |
| Baking | 18-22 minutes | Golden-brown crust forms |
| Cooling | 3 minutes | Filling stops bubbling |
Baking for the Perfect Finish
The final transformation happens in your oven’s radiant heat. Mastering temperature control and timing elevates good appetizers to flawless finger food your guests will crave.
Secrets to Crispy Golden Tops
Preheat your oven to 400°F while arranging filled caps on a parchment-lined sheet. This high heat caramelizes surfaces quickly, locking in moisture while creating that signature crunch. Bake for 18 to 22 minutes, watch for edges curling slightly and filling bubbling at the center.
You’ll know they’re ready when the breadcrumb topping turns honey-gold and cheese develops faint brown speckles. Lowering the temperature to 350°F extends cooking time to 25 minutes for extra tender results. Both methods work beautifully – choose based on your oven’s quirks.
Resist peeking during the first 15 minutes. Sudden temperature drops prevent proper browning. Use your oven light instead to monitor progress. Let baked caps rest 3 minutes before serving – this settling time improves texture and prevents burnt tongues!


Leave a Reply