Are you looking for a quick, easy, and healthy dinner option that doesn’t compromise on flavor? You’re in the right place! Preparing walleye is simpler than you think, and it’s a great choice for a weeknight dinner.
This recipe is not only fast, taking just 25 minutes from start to finish, but it’s also packed with nutrients. Walleye is a lean protein source rich in omega-3 fatty acids, making it an excellent choice for a delicious and healthy meal.
With minimal prep time and simple ingredients, you can enjoy tender, flaky walleye that’s sure to become a favorite. Let’s dive into this easy recipe that’s perfect for busy weeknights.
Table of Contents
What Makes Walleye a Prized Catch
As a freshwater fish native to North America, walleye has gained a reputation for its mild flavor and tender flesh. This reputation is well-deserved, given its characteristics and the various ways it can be prepared.
The Delicate Flavor Profile of Walleye
Walleye is highly regarded for its clean, mild flavor that appeals to a wide range of palates, even those who are not typically fond of fish. Walleye, a member of the perch family, is native to the lakes and rivers of North America, especially the Great Lakes region. The flesh of walleye is firm yet tender, with a delicate taste that avoids the strong “fishy” flavor often associated with other types of fish. This makes it an excellent choice for those looking to enjoy fish without the overpowering taste.
- Walleye’s mild flavor is complemented by simple seasoning, enhancing its natural taste.
- The firm yet tender flesh of walleye makes it a pleasure to eat.
Why Baking is the Perfect Cooking Method
Baking is considered an ideal cooking method for walleye because it preserves the natural moisture and delicate flavor of the fish. Unlike frying, which can overpower the subtle taste of walleye, baking allows the natural flavors to shine through while adding complementary seasonings. This method also provides a healthier preparation option that maintains the nutritional benefits of the fish.
Essential Ingredients for Perfect Baked Walleye
The key to a delicious baked walleye lies in selecting the right ingredients. To achieve a perfectly baked walleye, you’ll need to focus on both the quality of the fish and the accompanying flavors.
Baked Walleye in 25 Minutes: Simple, Healthy & Delicious
Course: LunchCuisine: AmericanDifficulty: Easy4
servings10
minutes15
minutes300
kcal🐟 Ingredients
- Main Dish
🐟 Walleye Fillets (4 pieces) – Fresh or thawed, firm and mild-flavored
🧂 Salt & Pepper – Basic seasoning
🧄 Garlic Powder – Optional, for deeper flavor
🌶 Paprika – Adds warmth and color
🍋 Lemon Slices/Zest – For brightness
🌿 Fresh Herbs (Parsley, Dill, Thyme) – Aromatic garnish
🧈 Butter or Olive Oil (for brushing) – Keeps the fish moist
- Garlic Lemon Butter Sauce (Optional)
🧈 Butter (3 Tbsp) – Base for sauce
🧄 Garlic (1–2 cloves) – Finely grated or minced
🍋 Zest & Juice of ½ Lemon – Adds fresh citrus punch
🌿 Fresh Herbs (2 Tbsp chopped) – Parsley or dill
✅ Tips for Success
- 💧 Pat dry to avoid steaming.
- 🌡 Use a thermometer to check doneness (145°F).
- 🧴 Avoid overcooking fish should flake easily.
Fresh Walleye Fillets: Selecting the Best Quality
Start with fresh, high-quality walleye fillets. When shopping, look for fillets that are translucent with a clean, mild scent. Firm flesh and no discoloration are also crucial indicators of freshness. If fresh walleye isn’t available, frozen fillets can be a good alternative when properly thawed. For those outside the Midwest, other mild white fish like grouper, pollock, sea bass, or halibut make excellent substitutes.
Seasoning and Flavor Enhancers
Basic seasonings that complement walleye’s delicate flavor include salt, pepper, garlic powder, and paprika. Lemon is also a classic pairing, adding brightness and enhancing the fish’s natural flavors. Fresh herbs like parsley, dill, or thyme add aromatic complexity, while butter serves as both a flavor enhancer and moisture provider, keeping the walleye tender during baking.
Optional Add-ins for Extra Flavor
To elevate your baked walleye, consider adding capers, olives, cherry tomatoes, or thinly sliced onions. For a bit of heat, red pepper flakes or a dash of cayenne can add warmth without overwhelming the delicate fish. These ingredients allow you to customise the flavour to your taste.
Kitchen Tools You’ll Need
To achieve a perfectly baked walleye, having the right kitchen tools is crucial. The right equipment not only makes the cooking process smoother but also ensures that your walleye is cooked to perfection.
Baking Essentials
For baking walleye, you’ll need a few baking essentials. A rimmed baking sheet or shallow baking dish is necessary for providing enough space for the fillets while containing any juices released during cooking. Lining your baking sheet with parchment paper or aluminum foil is highly recommended as it makes cleanup easier and prevents the delicate fish from sticking.
Measuring and Preparation Tools
In addition to baking essentials, having the right measuring and preparation tools is vital. Basic measuring tools, including measuring spoons and cups, ensure accuracy when adding seasonings and preparing accompanying sauces. A sharp knife is necessary for any final trimming of the fillets and for preparing accompanying ingredients like herbs or lemon. Other useful tools include a microplane or zester for adding fresh lemon zest or finely grated garlic, and a basting brush for applying olive oil or melted butter evenly.
- A fish spatula with a thin, flexible edge is ideal for handling tender walleye fillets.
- An instant-read thermometer ensures your walleye is cooked to the perfect internal temperature of 145°F.
- Small bowls for organizing pre-measured seasonings and ingredients help streamline the cooking process.
With these essential ingredients and preparation tools on hand, you’ll be fully equipped to create a delicious baked walleye dish. Proper preparation and the right kitchen tools make all the difference in achieving a perfectly baked dish.
Preparing Your Walleye Fillets
Preparing your walleye fillets correctly is the first step towards a deliciously baked dish. Proper preparation involves several key steps to ensure your walleye fillets are clean, dry, and well-seasoned.
Cleaning and Patting Dry
Begin by rinsing your walleye fillets under cold water to remove any debris or scales. Then, pat them dry with paper towels. This step is crucial as excess moisture can lead to steaming instead of browning during baking.
- Pat the fillets dry, ensuring they are completely moisture-free.
- Drying the fish helps the seasonings adhere better.
Removing Skin and Bones
If your fillets have skin, use a sharp, non-serrated knife to remove it. Hold the skin taut and slice between the flesh and skin. Check for pin bones and remove them using fish tweezers or needle-nose pliers.
- Use a sharp knife for easier skin removal.
- Remove pin bones by pulling in the direction they are angled.
Proper Seasoning Techniques
Season your walleye fillets just before baking. Sprinkle seasonings from about 10-12 inches above to distribute evenly. Consider a light brush of olive oil or melted butter before applying dry seasonings to enhance flavor and browning.
Read also: Grilled Halibut Recipes for Summer BBQs

Grilled Salmon with Lemon and Herbs
Simple Baked Walleye Recipe: Step-by-Step
With a few simple steps, you can achieve a mouth-watering baked walleye dish. This recipe guides you through preparing a delicious and healthy meal.
Preheating and Setting Up
Begin by preheating your oven to 400°F (205°C), the ideal temperature for baking walleye quickly while keeping it moist and tender. While the oven preheats, prepare a baking sheet by lining it with parchment paper or aluminum foil for easy cleanup.
Seasoning and Arranging the Fish
Gently pat the fish fillets dry using paper towels, then arrange them on the prepared baking sheet. Season the fillets to taste with salt, pepper, and a light brush of olive oil. You can also add additional seasonings or herbs according to your preference.
Creating the Perfect Foil Pouch
If using the foil pouch method, cut a piece of foil twice the size of your baking sheet and place it shiny-side down. Arrange the seasoned fillets in the centre, add slices of lemon or herbs if desired, and fold the foil over to seal the pouch. Use a fork or knife to poke a few small holes in the top to let steam escape during cooking.
Baking Time and Temperature
Bake the walleye fillets for 9-11 minutes if uncovered, or 12-15 minutes if wrapped in foil. The fish is done when it reaches an internal temperature of 145°F and flakes easily with a fork. Be careful not to overcook the walleye, as it can dry out easily.
The Garlic Lemon Butter Sauce

Enhance your baked walleye with a luxurious garlic lemon butter sauce—easy to prepare and full of flavor. This sauce perfectly complements the walleye’s delicate taste, adding richness without overwhelming its natural essence.
Ingredients for the Sauce
To make this delectable sauce, you’ll need 3 tablespoons of butter, 1-2 fresh garlic cloves, the zest and juice of half a lemon, and 2 tablespoons of fresh herbs like parsley or dill. The quality of these ingredients will directly impact the flavor of your sauce, so choose the freshest options available.
Preparing the Sauce While Fish Bakes
Begin preparing the sauce when your fish has about 5 minutes left to bake. Melt the butter in a small saucepan over low heat until it just begins to foam. Remove from heat and add freshly grated garlic, allowing the residual heat to release its aromatic compounds. Then, add the lemon zest and juice along with half of your chopped herbs, covering the saucepan to let the flavors infuse.
Drizzling Techniques for Maximum Flavor
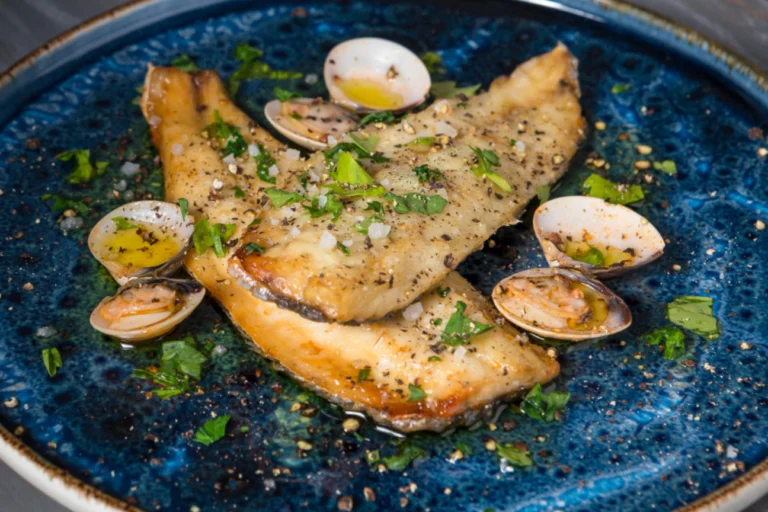
Once your walleye is cooked, arrange thinly sliced lemon on a serving platter, place the fish on top, and spoon the garlic lemon butter sauce over it. Top it off with a sprinkle of fresh herbs for a vibrant touch of color and an extra layer of flavor. This not only enhances the taste but also presents a visually appealing dish.
How to Tell When Your Baked Walleye is Done
To ensure your baked walleye is cooked to perfection, follow these guidelines. Cooking walleye to the right temperature is crucial, as undercooking poses food safety risks, while overcooking results in dry, tough fish.
Visual Cues for Perfectly Cooked Fish
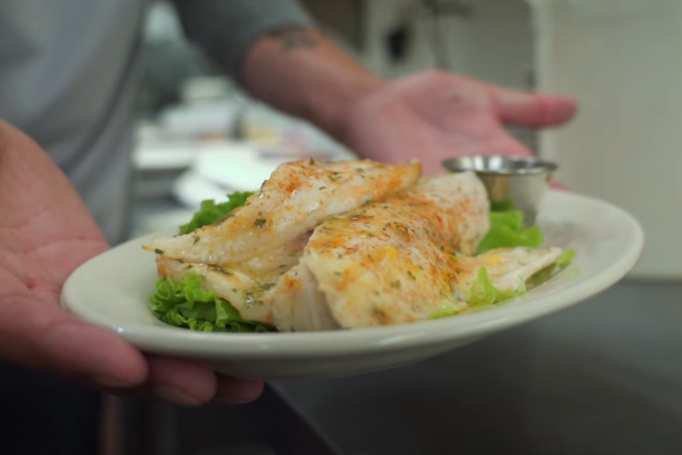
To determine if your baked walleye is fully cooked, watch for key visual cues: the flesh should change from translucent to a solid, opaque white throughout. A perfectly cooked fillet will flake easily when gently pressed with a fork at its thickest point. If it resists flaking or still looks raw in the center, give it a bit more time in the oven.
Using a Thermometer for Precision
For the most accurate results, use an instant-read thermometer inserted into the thickest part of the fillet to ensure it’s cooked to perfection.The FDA recommends that fish reach an internal temperature of 145°F for food safety. This method ensures your baked walleye is cooked to a safe and enjoyable level.
- The cooking time varies based on thickness; a general guideline is 10 minutes of baking time per inch of thickness at 400°F.
- Watch for slight shrinkage and clear protein seeping from the fish, indicating it’s approaching doneness.
- If baking in a foil pouch, carefully open it to check for doneness.
Delicious Variations of Baked Walleye
You can elevate your baked walleye game with these exciting variations. While simple baked walleye is delicious, exploring different flavors and techniques can add excitement to your meal rotation and showcase this versatile fish in new ways.
Parmesan Crusted Walleye

For a crispy exterior and tender interior, try parmesan crusted walleye. Dip fillets in beaten egg and then coat with a mixture of grated parmesan, panko breadcrumbs, and seasonings before baking at 400°F for about 15 minutes.
Herb and Spice Variations
Try experimenting with various herbs and spices to craft distinctive and personalised flavour combinations. For a Mediterranean twist, coat walleye with chopped fresh herbs like dill, parsley, and basil mixed with olive oil and lemon zest. Alternatively, spice lovers can create a Cajun-style walleye by rubbing fillets with a blend of paprika, cayenne, and other spices.
Regional Midwest Preparations
The Midwest offers its own regional takes on baked walleye. Minnesota-style walleye, for example, features a light coating of crushed saltine crackers and is often served with wild rice and local vegetables, showcasing the region’s culinary traditions.
Perfect Side Dishes to Serve with Baked Walleye

To create a well-rounded meal, consider these side dishes that go well with baked walleye. Choosing the right accompaniments can elevate the entire dining experience, adding both satisfaction and enjoyment to the meal.
Vegetable Pairings
Vegetable pairings are a great way to complement the delicate flavor of walleye. Options like roasted asparagus, sautéed green beans with almonds, or a medley of summer squash work particularly well. For a colorful addition, consider roasted cherry tomatoes with garlic and herbs, which provide a sweet-acidic counterpoint to the mild walleye.
Starch Accompaniments
Starchy sides like roasted baby potatoes with rosemary, wild rice pilaf, or creamy polenta offer satisfying accompaniments that absorb the delicious juices from the fish. These options not only complement the flavor but also add texture to the meal.
Fresh Salads and Light Sides
Fresh salads provide a crisp contrast to the tender fish. Try a cucumber, tomato, and red onion salad with feta cheese and a light vinaigrette for a Mediterranean touch. Alternatively, a simple green salad with lemon vinaigrette echoes the citrus notes used in the fish preparation, adding freshness to the meal.
Storing and Reheating Leftover Walleye
Properly storing and reheating leftover walleye is crucial for maintaining its quality and safety. When done correctly, you can enjoy your delicious baked walleye for another meal.
Refrigeration Guidelines
To store leftover walleye, place it in an airtight container and refrigerate promptly after it has cooled to room temperature. It’s best not to let it sit out for more than two hours after cooking. Leftover walleye will keep in the refrigerator for up to 2-3 days.
Best Reheating Methods
When reheating, gentle methods are best to prevent the fish from drying out. You can reheat leftover walleye in the oven by preheating to 350°F, placing the fish on a baking sheet, covering it loosely with foil, and heating for about 5 minutes. Alternatively, you can use a microwave: place the fish on a microwave-safe plate, cover with a damp paper towel, and heat on 50% power in 30-second intervals until warmed through.
Conclusion: Why This Baked Walleye Recipe Deserves a Spot in Your Dinner Rotation
This baked walleye recipe offers a perfect blend of health, flavor, and convenience. With a preparation time of just 25 minutes, it’s an ideal solution for busy weeknights when you want a healthy and delicious meal without spending hours in the kitchen.
The recipe’s versatility allows for countless variations, making it suitable for both everyday dinner and special occasions. By mastering this fundamental technique, you’ll gain confidence in cooking other fish varieties, expanding your culinary repertoire. This meal is not only delicious but also packed with lean protein, omega-3 fatty acids, and various vitamins and minerals, making it a great addition to your dinner rotation.