Do you remember that magical moment at your last family gathering? The one where a platter of creamy, tangy bites vanished before the main course even arrived? These crowd-pleasing appetizers are loved by all because they’re effortless to prepare, adaptable, and filled with nostalgia.
What makes basic ingredients like mayo and mustard turn into something amazing? It’s all about balance and creativity. A dash of pickle relish adds brightness, while smoked paprika brings depth. Plus, you can mix the filling hours before, letting flavors meld while you focus on other dishes.
Whether you’re hosting Easter brunch or a summer picnic, this dish fits any occasion. Try using Greek yogurt for a lighter twist. The key is starting with a reliable base recipe and then making it your own.
Imagine your guests’ smiles when they see that familiar platter. Now picture surprising them with new flavor twists. Mastering this classic opens up endless possibilities for unforgettable meals.
Table of Contents
Introduction to Deviled Eggs
What makes a simple appetizer a timeless favorite? It’s the way these creamy bites connect us to cherished memories while inviting bold experimentation. Their magic lies in balancing tradition with modern flair a skill perfected through decades of family kitchens and holiday feasts.
Why These Bold Flavors Stand Out
Today’s versions go beyond basic mayo and mustard. Creative cooks add zesty pickle brine for brightness or layer three types of mustard for depth.
These flavour upgrades don’t complicate the preparation process. You can mix your filling during naptime or while coffee brews, letting ingredients meld effortlessly. That’s why they shine at both weeknight dinners and fancy parties.
A Quick Look at the Recipe’s Nostalgic Roots
Many Southern families treasure slightly sweeter versions, often featuring a hint of relish or honey. These recipes frequently appear in handwritten cookbooks, passed down like heirlooms from grandparents who knew how to make ordinary meals feel special.
Whether presented on fine porcelain or simple picnic plates, this dish tells a story. It’s more than just ingredients it’s about capturing the moments that transform meals into lasting memories.
Essential Ingredients for Perfect Deviled Eggs
Transforming simple components into crowd favourites requires the perfect blend. Your star players? Farm-fresh eggs with vibrant yolks and creamy mayo that binds everything together. These foundational ingredients create the canvas for your flavor masterpiece.

Step-by-Step Guide to Hard Boiling Eggs
Cracking the code to perfect doneness starts with mastering three reliable techniques. Whether you’re prepping for a party or meal-prepping snacks, these methods guarantee consistent results every time

Three Paths to Perfect Doneness
| Method | Time | Key Step |
|---|---|---|
| Stovetop | 12 minutes | Add baking soda to boiling water |
| Instant Pot | 5 minutes | Natural pressure release |
| Oven | 30 minutes | Bake in muffin tin |
For stovetop fans: Start by covering your ingredients with cold water and bringing it to a boil. Add a teaspoon of baking soda. This secret hack helps the shells come off easily. Remove from heat, cover, and let sit for 12 minutes. This way, you won’t get gray yolks.
Instant Pot users: Pour one cup of water into the pot, place eggs on the wire rack, and set to high pressure for 5 minutes. After a 5-minute natural release, plunge them into an ice bath. The shells will practically jump off!
Read Also: Easy Vegan Appetizers for Parties & Holidays
Cooling Like a Pro
Shock-cooked ingredients in icy water immediately. This stops residual heat from overcooking them. Gently crack the shells under cool running water, then peel starting from the wider end where the air pocket is located. This helps keep the egg whites smooth and picture-perfect.
Remember: Older ingredients peel easier than fresh ones. Plan when possible, or add a pinch of salt to your boiling water for better shell separation.
Crafting the Perfect Filling
The heart of this beloved appetizer lies in its creamy center a delicate balance of texture and taste. Start by gently removing golden yolks from halved whites and placing them in a bowl.

Traditional Filling Methods
Take a fork and mash the yolks until they reach a fine, sandy texture. No lumps allowed! Add ¼ cup mayo, 1 teaspoon each of relish and mustard, plus a pinch of salt. Mix until smooth this yolk mixture should coat your spoon like velvet.
Pro tip: Taste as you go. Need more tang? Add mustard half a teaspoon at a time. Too dry? A splash of pickle juice brings everything together. Your bowl should hold a spreadable yet firm consistency.
Enhancing Your Mixture with Unique Additions
For next-level richness, blend in 1 tablespoon softened butter. Southern chefs swear by ½ teaspoon sugar and a dash of sweet pickle juice. Feeling bold? Two drops of Tabasco add warmth without overpowering.
If your mixture feels stiff, fold in Greek yogurt instead of extra mayo. The result? Lighter filling that still holds its shape when piped. Remember: Chill for 30 minutes before serving to let flavors marry beautifully.
Tips for Assembling and Serving Deviled Eggs
The final flourish turns simple ingredients into showstoppers. How you present and preserve your creations can elevate them from tasty to unforgettable. Let’s explore techniques that keep your appetizers looking sharp and tasting fresh.
Presentation & Storage Ideas
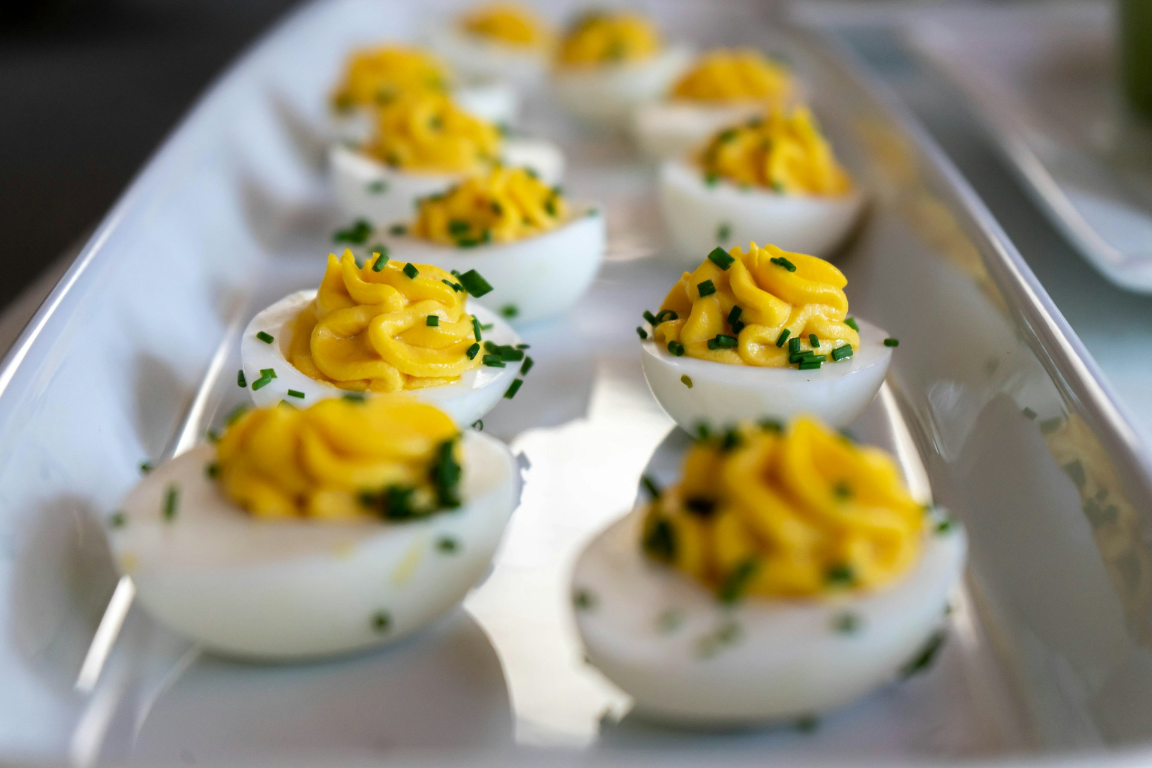
Transform basic bites into eye-catching delights using a pastry bag with a star tip. Pipe swirls into each white for instant elegance this method creates height and texture guests adore. Always wait to sprinkle paprika until right before serving. That vibrant red dust loses its pop if added too early.
Store assembled pieces in the refrigerator up to two days, but keep components separate for longer freshness. Boiled whites stay crisp in an airtight container, while filling thrives in a sealed bag or bowl. Need a last-minute garnish? Try fresh dill.
| Component | Storage Method | Duration | Pro Tip |
|---|---|---|---|
| Assembled | Airtight container | 2-3 days | Add paprika at serving |
| Whites | Paper towel-lined tray | 4 days | Cover tightly |
| Filling | Piping bag | 3 days | Re-mix before use |
For peak flavor, bring chilled fillings to room temperature before piping. This prevents condensation from making whites slippery. Always arrange pieces on a chilled platter it keeps everything firm during your gathering.
Creative Variations and Customizations
Why settle for ordinary when your appetizers can spark conversations? The beauty of this classic dish lies in its adaptability. With a few smart tweaks, you can craft creations that surprise even seasoned food lovers.
Flavor Twists: Avocado, Chives, and More
For a healthier twist, replace half the mayo with mashed avocado it adds creamy richness and heart-healthy fats. A touch of lime zest brightens the mix.
Fresh chives add more than color. Their mild onion bite cuts through richness when sprinkled on top. For herb lovers, mix dill or basil directly into the yolk blend. These aromatic additions transform basic recipes into gourmet delights.
Balancing Sweet and Spicy for a Signature Taste
Create depth by blending opposing flavors. A teaspoon of honey mellows out fiery cayenne pepper. Smoked paprika offers warmth without overwhelming heat. Adjust these elements to match your crowd’s preferences.
| Element | Sweet Option | Spicy Counterpart | Effect |
|---|---|---|---|
| Base | Honey | Chipotle | Smoky sweetness |
| Garnish | Candied jalapeño | Red pepper flakes | Sweet heat crunch |
| Mix-in | Roasted red pepper | Harissa paste | Complex layers |
Remember: Start with small amounts of bold ingredients. You can always add more, but you can’t remove excess spice once mixed. Taste as you go for perfect harmony.
Conclusion
You’ve now unlocked the secrets to crafting appetizers that disappear faster than holiday cookies. Whether using the stovetop method where you let sit minutes achieve perfect doneness or modern gadgets for speed, your technique ensures smooth egg white halves every time. The real magic? Balancing tradition with bold twists that make each bite uniquely yours.
Mastering water temperature and cooking time transforms basic ingredients into creamy fillings worthy of any occasion. Store components separately in the fridge, then assemble just before serving for peak freshness. This approach lets you focus on guests rather than last-minute prep.
Your newfound skills turn simple recipes into conversation starters. Swap half the mayo for avocado, or add a dash of smoked paprika for depth. These small tweaks keep the classic appeal while showcasing personal flair.
With reliable methods and creative freedom, you’re ready to impress at picnics, parties, or Tuesday night dinners. Keep experimenting every batch brings you closer to your signature version of this timeless favorite.